Book a FREE Trial
See why Code Galaxy is the #1 online coding
school of choice for students & parents.
In the dynamic world of technology, learning the art of coding from an early age gives children a competitive edge. Scratch, developed by the MIT Media Lab, stands as an excellent platform where beginners, especially kids aged between 7 to 18 years, can learn the coding basics through fun and interactive projects. The visually intuitive interface makes it easier to grasp complex programming concepts, fostering a love for coding right from the onset. As you delve deeper into this article, you will discover some invaluable Scratch coding tips that can facilitate a smooth coding journey for beginners.
Before you embark on the exciting journey of exploring the wonderful world of coding, it is essential to have your very own Scratch account set up and ready to go. Setting up an account not only marks the beginning of your coding adventure but also unlocks a myriad of features that the Scratch platform has to offer. Here, we walk you through a detailed guide to setting up your Scratch account.
Step 1: Visit the Scratch Website
Kickstart your journey by visiting the official Scratch website. The website is a gateway to a community brimming with creativity and learning.
Step 2: Signing Up
On the homepage, you will find the “Join Scratch” option. Clicking on it will lead you to the signup page where you will be asked to provide a username of your choice.
Step 3: Personal Details
The next step involves providing some personal details. This step is to ensure a safe and secure environment for all users, especially the young coders. Rest assured, the information is kept confidential and is only used to maintain a respectful and responsible community.
Step 4: Email Verification
After filling in the details, an email verification step ensures the authenticity of the new accounts. A verification link will be sent to the registered email address. Click on the link to verify your account.
Step 5: Your Scratch Dashboard
Upon verification, you can log in to your account and explore your dashboard. This is the place where you can find your projects, the projects you have liked, and the people you follow. It’s also a gateway to the vibrant Scratch community where you can view projects from people all around the world, gather inspiration, and even collaborate on projects.
Step 6: Join the Community
Having set up your account, you are now a part of a global community. You can now save your projects, share them with the Scratch community, and receive valuable feedback from fellow Scratch users worldwide. This feedback is a goldmine of Scratch coding tips and tricks that can help you grow and learn exponentially.
Related Reading: Scratch Project Ideas for Beginners
Embarking on your Scratch learning journey is an exciting phase. Here are some indispensable Scratch coding tips to help you navigate through it successfully:
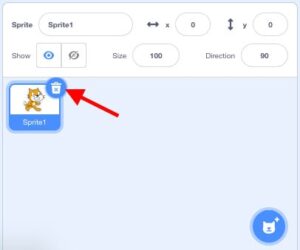
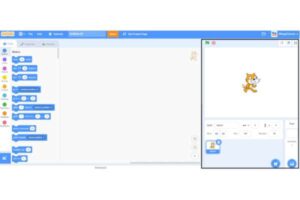
Sprites are the backbone of any project created in Scratch, acting as the characters that bring your story, game, or animation to life. Mastering the art of utilizing sprites is an essential skill in Scratch coding.
The first step in mastering sprites is understanding how to add new sprites to your canvas. In the Scratch interface, you will find a variety of options, allowing you to choose from a rich library of sprites or even create your own from scratch or by uploading an image. You can add a personal touch to your projects by customizing your sprites, modifying their appearances, and creating a series of costumes to animate them in various poses and expressions.
Deleting sprites is just as straightforward. It helps in maintaining a clutter-free working space, removing unnecessary elements and focusing on the vital components of your project. Remember that a clean workspace is key to a successful project, so don’t hesitate to remove sprites that are no longer needed.
Manipulating the size and appearance of your sprites is another crucial skill. Sprites can be resized, flipped, or rotated to fit perfectly within your project, giving a dynamic appearance to your creations. Experimenting with different sizes and perspectives can add depth and dimension to your project, making it more visually appealing.
Costumes play a pivotal role in animating your sprites, allowing them to express different emotions, change appearances, or depict motion. Learning how to change costumes dynamically through coding blocks can enable you to create lively and expressive animations.
In addition to these functionalities, mastering the control of sprites through various motion blocks can set the stage for more advanced coding adventures. Learn how to move your sprites smoothly across the stage, have them react to different events, and interact with other sprites or the user, setting a strong foundation for creating interactive and engaging Scratch projects.
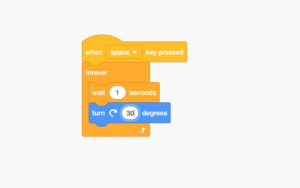
Understanding and utilizing Scratch blocks proficiently is pivotal as they serve as the building blocks of your Scratch project. These blocks, each having unique functionalities, are categorized into groups such as motion, looks, and sound, aiding in a structured approach to building your project.
To start, get familiar with different categories of Scratch blocks; motion blocks help in controlling the movement of sprites, while look blocks assist in altering the sprites’ appearances. Understanding these categories is the foundational step in crafting interactive and vibrant projects.
Creating scripts is your next step. Scripts are created by connecting a series of blocks, essentially forming a set of instructions for your sprites. This is where you can let your creativity flow, experimenting with various block combinations to create distinct outcomes. You can begin with simple scripts and gradually move to more complex combinations, integrating sounds, events, and even variables for a richer narrative.
Remember to take advantage of the custom blocks feature as you advance. It allows you to construct a block comprising a script that can be used repeatedly in your project, promoting efficiency and saving time.
As you experiment, don’t hesitate to use the “Help” feature to understand the functionality of different blocks better. This interactive tool offers guidance, helping you become proficient in using Scratch blocks to their fullest potential.
Related Reading: Block Coding for Kids
When venturing into larger projects with Scratch, the organization becomes your best friend. As the scripts grow in complexity, keeping them organized not only helps in maintaining a clear narrative but also in debugging at later stages.
To begin with, always group related blocks together. It helps in creating a visual and logical grouping of functionalities, which makes it much easier to understand the flow of your project at a glance. This is an excellent practice as it aids in quickly identifying and isolating parts of your project during the debugging process.
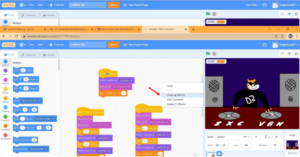
Incorporating comments in your scripts is another strategy that cannot be overstressed. Comments allow you to annotate your scripts, giving you space to note down the purpose of a particular set of blocks or to leave reminders for necessary changes in the future. It becomes a kind of documentation that not only helps you but also assists others in understanding your scripts when you share your projects.
Lastly, while working on more advanced projects, it is advisable to periodically review and refactor your scripts. Refactoring involves revisiting your scripts and making them more efficient, removing unnecessary blocks, or restructuring them for better readability and performance. It’s a habit that encourages continuous improvement and learning.
In the world of coding, encountering bugs is inevitable, making debugging an essential skill to develop. As you dive into Scratch coding, learning to identify and rectify common bugs in your projects will be vital.
To commence your debugging journey, familiarize yourself with common bugs that you might encounter. These could range from simple issues like misconnected blocks to more complex issues like logical errors in your script. Having a basic understanding of these common problems will arm you with the knowledge to prevent them and fix them swiftly when they occur.
A significant tool at your disposal is the “see inside” feature, which allows you to delve deeper into your scripts, examining each block and its connections closely. Utilizing this feature will enable you to pinpoint exactly where things have gone amiss, helping you to identify incorrect block combinations or misplaced blocks that are causing errors.
Moreover, cultivate the habit of testing your scripts frequently. Regular testing allows you to catch bugs early on, making the debugging process less daunting. While debugging, it can be beneficial to isolate sections of your script, testing them individually to ensure they function as intended before integrating them back into the main project.
In conclusion, debugging is not just about fixing errors; it is a proactive process of enhancing the quality and functionality of your project. Embrace this process as an opportunity to learn and improve, turning your Scratch projects into well-oiled machines that run smoothly and efficiently.
See why Code Galaxy is the #1 online coding
school of choice for students & parents.
The stage area in Scratch coding is the canvas where your creations come to life, and mastering its utilization can significantly elevate your projects, bringing a dynamic and visually pleasing element to your work.
To start, learn how to change the backdrops effectively. Backdrops set the scene for your project, providing a context for your sprite’s actions. You can choose from the variety of backdrops available in the Scratch library or design your unique backdrop, adding a personalized touch to your projects.
Aside from backdrops, understanding how to use the stage size to your advantage is key. Experiment with different stage sizes to find the one that fits your project best. A well-chosen stage size can enhance the visual appeal of your project, providing ample space for your sprites to move and interact, creating a more immersive experience for your audience.
Lastly, consider the interaction between your sprites and the stage. Learn to use coordinates effectively to position your sprites accurately on the stage, creating harmonious interactions between the sprites and the backdrop. The stage can be more than just a backdrop; it can be an active participant in your story, reacting to sprite actions and changing dynamically as the script unfolds.
To initiate, focus on mastering the use of motion blocks. These blocks are the powerhouse behind smooth animations, helping you to control the movements of your sprites with precision. Play around with different motion blocks to discover how to create fluid movements that mimic real-life motions, adding a realistic touch to your animations.
But what’s an animation without a little sound? Incorporate sounds to breathe life into your animations. Sounds can be used to emphasize actions, create mood, and enhance the storytelling experience. You have the freedom to choose from the pre-existing library of sounds in Scratch or upload your custom sounds, allowing you to tailor the auditory experience precisely to your taste.
Moreover, don’t overlook the potential of changing looks in your animations. By modifying the costumes and appearances of your sprites dynamically as the animation progresses, you can create a visually rich narrative, illustrating complex actions and emotions that resonate with your audience.
As you create your animations, remember to pay attention to the finer details. Subtle changes in sprite expressions, timed perfectly with the narrative, can add depth to your animation, making it truly engaging and captivating. The goal is to immerse your audience in a vibrant, animated world where each detail tells a story, enhancing the overall experience and leaving a lasting impression.
As you delve deeper into Scratch coding, embracing the advanced functionalities of variables and lists becomes imperative. These tools allow you to build projects with a higher degree of complexity and dynamism. Let’s explore how to use these features proficiently:
To start with, get accustomed to using variables. Variables act as storage units for data, holding information that can be used and manipulated throughout your project. Understanding how to create and use variables can empower you to add interactive elements to your projects, such as scoreboards and dynamic feedback systems.
Following variables, acquaint yourself with lists. Lists have the power to store multiple pieces of information, essentially acting as a collection of variables. Learning to use lists effectively can facilitate the creation of more organized and efficient scripts, paving the way for complex narratives and interactive features in your projects
While utilizing these tools, focus on how variables and lists can interact with each other and with other elements of your Scratch project. For instance, a list can be used to store different states of a game, and variables can be used to track the current state, enabling the creation of dynamic and responsive projects.
Experiment with different ways to use variables and lists in your projects. Consider creating quizzes, interactive stories, or simulation games, where these elements can truly shine, adding depth and functionality to your creations.
Remember, mastering variables and lists is a gradual process. Take time to experiment, learn from your experiences, and gradually build up your skills. These Scratch coding tips are designed to help you build a robust understanding, setting a strong foundation for your more advanced Scratch coding endeavors.
In the Scratch coding universe, one of the most enchanting endeavors you can undertake is crafting interactive stories that enthrall your audience. Here are some Scratch coding tips to guide you in nurturing your storytelling skills through coding:
The cornerstone of interactive stories is the dynamic interaction between various elements, primarily facilitated through broadcasting. Understanding broadcasting allows you to create intricate interactions between different sprites, enhancing the depth and complexity of your narratives. Broadcast messages can trigger specific actions or changes in other sprites, thereby orchestrating a coordinated performance that unfolds as a rich story.
Dialogues are indispensable when it comes to storytelling. Learn how to integrate dialogues proficiently to develop compelling narratives. Experiment with different ways to present dialogues — you can utilize speech bubbles, interactive text boxes, or even incorporate sound recordings to give your characters a voice. These dialogues can carry the story forward, reveal character personalities, and build a captivating storyline that holds your audience’s attention.
As you venture further, consider adding layers to your story through subplots, introducing unexpected twists and turns that keep the viewers on the edge of their seats. Remember, a good story often contains elements of suspense, mystery, and emotional depth, bringing characters to life through their dialogues and actions.
A significant part of building interactive stories is also the visual representation. Focus on creating visually pleasing scenes that resonate with the storyline, utilizing vibrant backdrops and costumes to set the right mood for each scene.
In essence, interactive storytelling through Scratch coding offers a playground for your imagination, where you can bring your most vivid narratives to life, showcasing your storytelling prowess while honing your coding skills.
Begin by grasping the fundamental aspect of game development — setting up controls for your game. Understand the different control blocks available in Scratch and learn how to configure them to ensure a smooth gaming experience. Setting up intuitive controls that are easy to use is the first step towards creating a game that players will enjoy.
Next, focus on developing a scoring system to inject a competitive spirit into your game. Integrating a scoring system not only makes the game more exciting but also adds a goal that players can strive to achieve. Learn how to create variables to track scores and design a scoreboard that displays the players’ performance, adding a dynamic and competitive edge to your game.
To further enhance the gaming experience, consider adding multiple levels of increasing difficulty, introducing new challenges and obstacles as the player progresses. This not only makes the game more engaging but also offers a sense of achievement as players overcome each level.
Don’t forget the aesthetics; the visual and auditory elements of the game play a crucial role in captivating players. Work on creating vibrant graphics and incorporating engaging sounds to create an immersive environment that enhances the gameplay experience.
Related Reading: Best Scratch Games
How to Make a Clicker Game on Scratch
Before you share your project, ensure that it is polished and free of bugs. A good practice is to run your project several times, fixing any errors and making necessary adjustments to enhance the overall user experience.
When your project is ready for the world, learn the steps to upload it onto the Scratch platform. The process is quite simple, involving a few clicks to share your work with a global audience. Remember to add an engaging title that captures the essence of your project, along with a detailed description to provide potential viewers with a glimpse into what your project is about.
After uploading, the real magic begins as you engage with the Scratch community. Be prepared to receive constructive feedback, which is a golden opportunity to learn and grow as a coder. Actively participate in the community discussions, being open to suggestions and willing to tweak your project based on the feedback received.
Moreover, don’t just be a receiver; be sure to also explore other creators’ projects, offering them feedback and encouragement. Being actively involved in the Scratch community fosters a rich learning environment, where you can glean Scratch coding tips from others’ projects and experiences, and continually evolve in your coding journey.
Keep in mind that sharing your project is not the end, but a new beginning in your learning pathway, where you embark on a collaborative journey of growth and exploration in the vibrant world of Scratch coding.
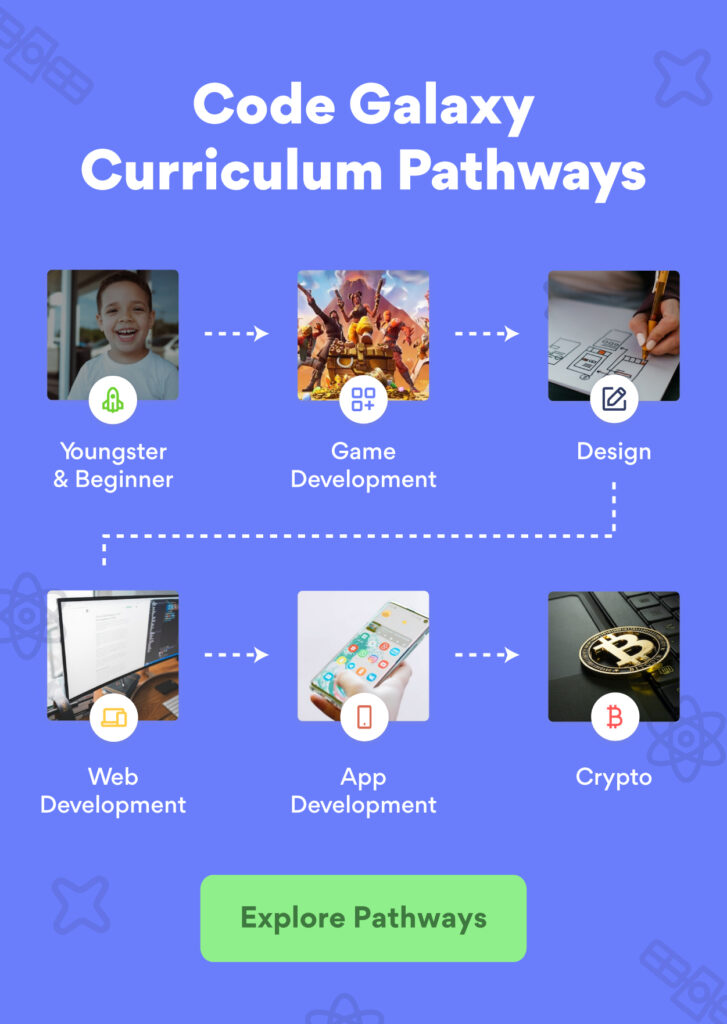
Starting your coding journey can be a lot more fun and easy with the right guidance. Code Galaxy’s Scratch curriculum is here to help. It is created with young learners in mind, helping you step by step as you learn to code from the basics up to advanced levels. With useful Scratch coding tips from experts, you’ll have all the support you need to explore and enjoy coding.
So, are you ready to dive into the world of coding? Code Galaxy is the place to start. It’s full of easy-to-use resources that make learning fun and creative. And here’s the good news – you can try it out for free. Sign up for a free trial today and take the first step on your coding adventure.


See why Code Galaxy is the #1 online coding
school of choice for students & parents.