Book a FREE Trial
See why Code Galaxy is the #1 online coding
school of choice for students & parents.

Scratch is a free, web-based platform developed by MIT that introduces individuals, especially young learners and beginners who are curious about how computer programs work, to the world of programming. Instead of writing complicated code, as professional programmers do, on Scratch kids get to play with colorful blocks that fit together like puzzle pieces. Each of these blocks has a specific command, and when put together in different ways, like a digital Lego, they can build their own computer games, animations, and even mini-simulations.
Scratch doesn’t just teach coding. It instills a love for it. By demystifying the complexities of programming and presenting it as a creative, constructive, and captivating endeavor, Scratch ensures that the journey of learning to code is as rewarding as the destination itself. It is a fantastic way for anyone just starting out to understand and fall in love with coding.

In the Scratch interface, the stage is the rectangular area on the right, where the action of a project unfolds. Think of it as a digital canvas where sprites (characters or objects) perform, interact, and display various programmed actions.
When you first open the Scratch editor, your attention is immediately drawn to the rectangular area on the right – this is the Stage. Resembling a theater stage, it is the space where all the animated action unfolds, characters (sprites) interact, and stories come alive.

Everything that the viewer interacts with or watches occurs on this stage. The stage showcases backgrounds, or as they’re called in Scratch, “backdrops,” which can be static images or dynamic designs that respond to user input or other triggers. They are integral to setting the mood, context, and atmosphere of your project. These can be serene landscapes, bustling cityscapes, abstract patterns, or anything your project demands.
Starting a new Scratch project is similar to being handed a blank canvas or an empty stage. It is a space filled with endless possibilities, limited only by imagination. With the right scripts, it can respond to user actions, change its backdrops, adjust its lighting through visual effects, and much more, making it a dynamic entity in the vast cosmos of Scratch.
At the heart of every Scratch project lie two fundamental entities: the stage and sprites. Their roles, while closely interwoven, are distinct and essential to the entire coding process.
Imagine the characters in a play or the props that come to life in a story – those are similar to what sprites are in Scratch.
Sprites are the characters or objects that move, animate, and interact on the Scratch stage. They are the dynamic elements controlled by scripts created from blocks. Each sprite can have multiple costumes, allowing for visual changes during animations.
The Stage, however, is static. Sprites are not just limited to a single appearance or form. They come with a wardrobe of sorts, called costumes in Scratch terminology. Just as an actor might change outfits between scenes, a sprite can switch between its costumes.
While it can change backdrops and respond to events with visual effects, it remains anchored in its position, not moving around like sprites. If Scratch were a theater, the stage would be the backdrop set, and the sprites would be the actors performing on it.
This feature adds a layer of depth and versatility, enabling a sprite to change its visual form to denote different emotions, actions, or stages in a narrative. For instance, a bird sprite might have multiple costumes to depict various stages of flight, from flapping its wings to soaring effortlessly.
In essence, while sprites and the stage serve different functions in Scratch, their synergy creates the immersive and interactive experiences that make Scratch projects so unique and engaging.
In Scratch, the stage serves as the canvas where all the magic happens. Whether it’s an interactive game, an animated story, or a dynamic simulation, everything plays out on this stage. To accommodate various project needs and viewing preferences, Scratch offers three distinct stage sizes: the regular size, the small stage layout, and the fullscreen mode. Let’s take a closer look at each.
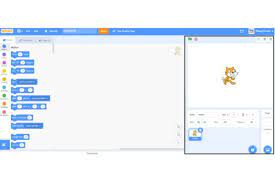
The regular size is the default view when you open or edit a Scratch project. The standard dimensions of this Scratch stage are 480 pixels in width and 360 pixels in height, resulting in a 4:3 aspect ratio.
This size offers a broad canvas for users to showcase their projects. It is optimized for a balance between workspace for coding and stage visibility, ensuring users can code and instantly see the results side by side.
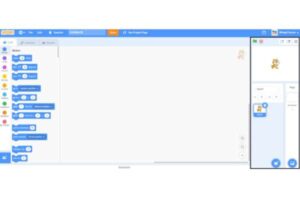
The small stage layout is useful when screen real estate is limited or when a user wants to prioritize block coding space over stage visibility. It provides a larger workspace for coding while still allowing a real-time view of the project’s output, albeit in a reduced display size.
While the actual stage size in terms of pixels remains the same (480×360), the small stage layout shrinks the visible size of the stage within the Scratch editor. This provides a more compact view.

Fullscreen mode is ideal for presenting a completed project. It offers viewers an unobstructed and immersive experience of the Scratch project, free from the distractions of the coding blocks or editor interface. Whether you’re showcasing an interactive game, narrating a story, or guiding through a simulation, the fullscreen mode ensures your audience is fully engaged.
In fullscreen mode, the Scratch stage expands to occupy the entirety of the user’s display. The pixel count remains the same, but it scales to fit the screen, providing an immersive experience.
While the intrinsic pixel dimensions of the Scratch stage remain constant, the platform offers these three viewing sizes to cater to different developmental and presentation needs. Whether you’re in the thick of coding, tweaking your project, or proudly presenting your masterpiece, there’s a stage size that’s just right for the occasion. By understanding and utilizing these options, Scratch users can optimize their project creation and viewing experience.
See why Code Galaxy is the #1 online coding
school of choice for students & parents.
Scratch’s stage is meticulously designed with a fixed dimension of 480 pixels in width and 360 pixels in height. Crafting backdrops or importing images without considering these specific dimensions can lead to undesirable results.
For example, important scenery elements or characters might get cut off, diminishing the visual appeal and potentially confusing viewers.
Always design your backdrops keeping the 480×360 pixels size in mind. It ensures that your projects look polished and professional, with every element fitting snugly within the stage’s confines.
Just like layers in a painting or a graphic design tool, Scratch sprites have a stacking order. The most recent sprite to move to a location will appear on top.
This layering effect can be utilized strategically in animations and games.
Be intentional about sprite placements. Choreograph their movements considering this layering effect to ensure that the most important elements remain visible and stay in the foreground.
Efficient use of backdrops can simplify project designs and enhance storytelling. Transitioning between different backdrops can simulate scene changes, shifts in time, or evolution in-game levels.
Storyboard your project before diving in. Instead of cluttering a scene with too many sprites, use multiple backdrops and transition between them to depict different scenarios or game levels.
Plan out where backdrop transitions can replace complex sprite animations, making your project more streamlined and efficient.
The edges of the Scratch stage can sometimes be risky zones, especially when creating interactive content. Important actions or sprites located too close to the boundaries might not be fully visible on all devices or might be easy for users to overlook.
When creating interactive projects, keep crucial sprites and interactions away from the stage’s edges. Establish a “safe zone” buffer within the stage, ensuring that all vital interactions, buttons, or primary sprites are placed comfortably within this area. This ensures that you don’t miss out on key parts of the project, regardless of your device or screen resolution.
The beauty of Scratch lies in its accessibility. Projects can be accessed and played on a myriad of devices, from desktop monitors to mobile phone screens.
What looks perfect on your computer might appear cropped or misaligned on a tablet or a smartphone. Ensuring multi-device compatibility means a wider audience can enjoy your creation without hiccups.
Regularly preview your project on various devices. Address any visibility or interaction anomalies to ensure your project is universally accessible.
Related Article: Scratch Coding for Kids Is the Foundation to An Intuitive Coding Experience for Years to Come
No, the Scratch stage has a fixed dimension of 480×360 pixels. However, you can design larger backdrops or sprites, keeping in mind that only a portion will be visible on the stage at any given time.
There’s no strict limit to the number of backdrops. However, for the sake of project simplicity and manageability, it’s a good idea to only include the ones necessary for your project.
This happens when a sprite’s size or position causes it to extend beyond the stage’s boundaries. Adjust the sprite’s size or position to ensure it fits within the 480×360 pixel area.
You can use the “switch backdrop to” and “next backdrop” blocks within the Scratch editor. These allow you to control when and how you transition between your project’s various backdrops.
Yes, Scratch allows you to upload your own images to be used as sprites or backdrops. This enables greater personalization and creativity in your projects.
No, as of the last update, Scratch supports static images as backdrops. However, you can simulate video-like effects by using a sequence of images or leveraging sprite animations.
If you’ve been thinking about starting your code journey, there’s no better time than now. With the right platform and guidance, your coding journey can be fun and easy. This is where Code Galaxy’s Scratch curriculum comes in. It is created with beginners and young learners in mind, as it teaches you step by step to learn to code from the basics up to advanced levels. With useful Scratch coding tips from experts, you’ll have all the support you need to explore and enjoy coding.
Are you ready to begin your coding journey? Code Galaxy is the perfect place to start. Here, you can find lots of easy-to-use resources that will make learning fun and creative and the good news is you can try it out for free!
Sign up for a free trial today and take the first step on your coding adventure.


See why Code Galaxy is the #1 online coding
school of choice for students & parents.