Book a FREE Trial
See why Code Galaxy is the #1 online coding
school of choice for students & parents.

Scratch has redefined the landscape of educational technology, particularly in the realm of coding and digital literacy. This programming environment stands out not only for its intuitive design but also for its effectiveness in making the world of coding accessible and appealing to a younger audience. It is more than just a tool; it is a digital canvas where imagination meets logic, allowing users, particularly children, and coding novices, to translate their creative ideas into interactive digital projects.
At its core, Scratch is built around the concept of simplicity and engagement. The platform employs a unique block-based coding approach, where users can drag and drop code blocks to animate characters, create games, or build interactive stories. It is this very nature of Scratch that ignites a passion for technology and problem-solving in young minds.
However, with the creation of such diverse and intricate projects comes the need for reliable methods of saving and managing work. In the digital space of Scratch, the ability to effectively save projects is not just a technical necessity but also a critical component of the creative process. Regularly saving work ensures that users don’t lose their valuable progress to unexpected glitches or interruptions. It also allows for a smoother workflow, where projects can be revisited, refined, and enhanced over time.
In essence, Scratch’s appeal lies in its ability to make learning to code a fun, engaging, and creative experience. The platform not only serves as a stepping stone into the world of programming but also as a vibrant community where the seeds of future innovation are sown and nurtured. Understanding how to effectively manage and save projects in Scratch is a key part of this journey, ensuring that every coding adventure, no matter how big or small, is preserved and valued.
Related Reading: Scratch Coding Tips For Beginners

Saving and organizing projects on Scratch are akin to maintaining a digital portfolio. This portfolio is a tangible representation of a young coder’s journey and achievements. It is something they can look back on with pride, seeing the tangible results of their learning and creativity. Furthermore, it is a body of work they can share with the Scratch community and the world at large. Sharing projects opens up opportunities for feedback, collaboration, and even inspiration for others – all critical aspects of learning and growing in any field, especially in coding and digital literacy.
Here’s a step-by-step guide on the best way to save your project on Scratch:
Open Scratch and begin your project. You can start from scratch or modify an existing template.
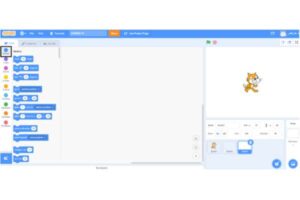
Once you’re in the Scratch editor, look for the ‘File’ menu at the top left corner of the screen
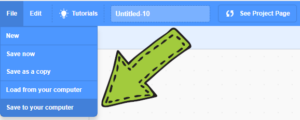
Click on ‘File’, and then select “Save to your computer”. Click on it to save. If this is your first time saving this project, you’ll be prompted to give it a name. Choose a descriptive and relevant name for your project. This makes it easier to identify and organize your projects later.
When you click “Save to your computer”, it takes you from the Scratch Desktop to your file explorer on your computer. You must remember that the required file extension for saving a Scratch project of any kind on your computer is “.sb”. Not using this extension may result in your project not being saved successfully.
After naming and saving, look for a confirmation message that your project has been saved. Scratch also displays the time of the last save.
Related Reading: How to Make a Platformer Game on Scratch
How to Turn on Turbo Mode in Scratch
In the dynamic and inventive world of Scratch, the practice of regularly saving your projects is not just a precaution; it is a fundamental part of the creative and learning process. Every project on Scratch, be it a basic animation or a complex game, represents a considerable investment of time, creativity, and problem-solving.
Regularly saving this work ensures that none of these valuable efforts go to waste. The unexpected can always happen; from power outages to system crashes and the last thing any young coder wants is to lose hours of hard work to such unforeseen events.
Here are a few reasons why it is important to save your projects on Scratch:
Regularly saving your Scratch projects is a safeguard against unexpected occurrences like system crashes or power outages. This habit ensures that the effort and time invested in creating a project aren’t lost due to such unforeseen circumstances.
Saving your work enables you to monitor your growth and development in coding. It allows you to revisit earlier projects, compare them with current ones, and observe your evolving skills and understanding of programming concepts.
By saving your projects, you can go back to them at any time to make improvements or add new features. This iterative process is a key aspect of learning and skill development in coding.
Regular saving and organizing of projects create a digital portfolio that showcases your journey and achievements in coding. This portfolio can be shared with the Scratch community and others, offering opportunities for feedback and collaboration.
The practice of saving and organizing projects on Scratch teaches young coders how to manage digital files effectively. This skill is crucial in our digital age and instills a sense of responsibility and ownership over digital creations.
Consistently saving projects fosters a sense of pride and ownership in young coders. It encourages them to take their creations seriously and view them as valuable assets worth preserving and sharing.
See why Code Galaxy is the #1 online coding
school of choice for students & parents.
The ability to save and revisit past projects encourages a reflective learning process. Coders can look back at their work, identify areas for improvement, and apply these insights to future projects.
Saved projects can be shared within the Scratch community, opening doors for feedback, collaboration, and inspiration. This interaction is a crucial part of growing and learning in the field of coding.
Related Reading: How to Collaborate on Scratch
Here are a few tips on things to take note of as you save your project on Scratch:
1. Save Frequently: Make a habit of saving your progress at regular intervals. This prevents significant data loss in case of any technical glitches
2. Use Descriptive Names: A clear and descriptive name for your project makes it easier to locate and manage your work.
3. Understand Autosave: Scratch has an autosave feature, but it is best not to rely on it entirely. Manual saving gives you more control over your versions and changes.
4. Back-Up Your Work Externally: While Scratch saves your projects on its servers, it is a good practice to periodically download and store copies of your projects on your own computer or cloud storage. This extra step provides an additional layer of security against data loss.
5. Organize Projects into Folders: If you are working on multiple projects, use Scratch’s folder system to organize your work. This can help keep your projects sorted by type, progress status, or any other categorization that suits your workflow.
6. Minimize Work Loss by Saving Before Complex Changes: Before making major changes or experimenting with new code blocks, save your project. If the new changes don’t work as expected, you can always revert to the saved version.
7. Save Before Exiting: Make it a routine to manually save your project before exiting Scratch. This habit ensures that all your recent work is safely stored.
By incorporating these tips into your Scratch usage, you can ensure that your creative work is effectively saved and preserved, allowing you to focus more on the creative aspects of your projects with peace of mind.
Here are more frequently asked questions regarding saving projects on Scratch, along with their answers:
Check your internet connection, as Scratch requires it to save projects. If problems persist, try saving again after a few minutes or restarting Scratch.
Yes, you can download and save your Scratch project to your computer for offline access.
Scratch autosaves your project at regular intervals. However, the frequency can vary based on your internet connection and other factors. It’s still recommended to manually save your project to ensure all changes are captured.
If Scratch consistently fails to save your work, try clearing your browser’s cache and cookies. Also, ensure that your browser is up to date. If the issue persists, consider using Scratch in a different web browser or contact Scratch support for assistance.
Scratch doesn’t natively support version history. Therefore, it is important to manually save versions of your project if you want to revert to them later. You can do this by downloading and renaming each version to keep track of changes.
If the autosave feature is active and functioning properly, your most recent changes should be saved. However, it is always safer to manually save your project frequently, peradventure your browser closes accidentally.
Currently, Scratch does not impose a limit on the number of projects a user can save. However, organizing your projects can help manage your workspace effectively.
Projects on Scratch are saved in a specific format (.sb3 for Scratch 3.0) that is only compatible with the Scratch platform. However, you can export your project and save it as a .sb3 file on your computer.
Mastering the art of saving your projects in Scratch not only secures your hard work but also streamlines your coding experience. By regularly saving and properly organizing your projects, you build a reliable and efficient coding practice. This habit is particularly invaluable in the long run, as it ensures that your creative journey on Scratch is both productive and rewarding.


See why Code Galaxy is the #1 online coding
school of choice for students & parents.